Showing posts with label ceremony decorations. Show all posts

Wednesday, September 16, 2009

I DIY'd Pomanders Too!

Like the many Bees who have gone before me (think Mrs. D'orsay and Mrs. Spring Roll), I have opted to make tissue paper pomanders to decorate our ceremony site!

I had been searching high and low for options that would look great, be non-fussy, and affordable. I started seeing these pomanders pop up on Weddingbee and on other sites, so when I came across these instructions and saw how simple it looked, I picked up the supplies to make a couple of pomanders (I waited to buy all of the styrofoam balls until I was sure I wanted to make a lot of these).

I opted for 4-inch styrofoam balls, and would guess that it took anywhere from 15-20 flowers for each pomander. And, better yet, Mr. S got in on the flower making action and helped me make some!


I was only going to make 8 pomanders (so 4 on each side of the aisle, spaced out), but I had enough styrofoam balls and TONS of tissue paper and ribbon, so I just kept on going until I got 10 done.

Originally I had absolutely no clue how we were going to attached these to the pews. I'd bought some of these pew clips, but once I got them I realized there was just no way they'd fit over the top of the pews. I was getting SO frustrated...until, that is, we went for our last meeting with our minister a couple of weeks ago and checked out the pews. There are teeny, tiny little hooks on the end of the pews for just this purpose!!

So, as you can see below, I just took some string and, using a needle, pulled it through the top of the ribbon and created little loops. The pomanders should now perfectly hang!


This was by far one of the easiest DIY projects and I'm so glad that this is what I ended up doing! It's a minimal investment and will compliment the aesthetic of our wedding overall. Our church has a 100 year old sanctuary with dark wood and pale yellow walls, so keeping our ceremony decor as minimalist as possible will definitely compliment the space.

Are you DIY'ing your ceremony decor?

Read more...

Friday, February 27, 2009

Kusudama DIY Project

I had posted previously about Japanese kusudama, which are paper balls, usually made out of flowers or other shapes. The origami skills needs to create these cute little flowers is not anything that should intimidate anyone who hasn't done origami before. But actually finishing a kusudama is time consuming! One kusudama is made up of 12 flowers, or the equivalent of 60 petals.

After a full Sunday afternoon of work, I had my finished my practice kusudama!


I love how delicate yet structured it is! I think it would be perfect to have a long piece of ribbon or even tulle ribbon strung along the side of the pews in my church, with a kusudama here and there.

To make the flowers that make up this kusudama, check out these instructions:

Folding Tree's Kusudama Instructions, part 1

To learn how to take your flowers and turn them into a kusudama, check out these instructions:

Folding Tree's Kusudama Instructions, part 2

You'll need the following to complete a kusudama:
  • 60 square pieces of paper (origami or another lightweight paper)
  • Glue (I just used white craft glue)
  • Optional - bamboo skewer to easily (and cleanly!) spread the glue
  • Ribbon - if you want to hang your kusudama
You might be thinking to yourself, where am I going to get all of this paper and just how expensive is it going to be? I was luck enough to find this set of 1,000 pieces of origami paper on Amazon.

Source: Amazon

For $13.95 I received 1,000 sheets of paper divided between 15 different colors, all in this great pattern, shown above. The sheets are 2.75in squares - initially I had thought these would be far too small and almost didn't buy the paper. However, since each square creates a petal, which them becomes part of a flower, and 12 flowers create a kusudama, it really is the perfect size! My kusudama measures about 6 inches around, so is perfectly cute!

The colors in the set includes shades of blues, pinks, yellows, greens and oranges, with rougly 65 pieces of paper per individual color. In the example I made above, I made 6 flowers with the light blue patterned paper. For the other flowers I used a darker blue, however I made the flowers wrong-side out so that they are white with a tint of blue. I really like this effect, and for the wedding I will (of course!) use the green patterned paper and use probably 2 green flowers per kusudama and make the rest white flowers. I should have enough paper for roughly 12 or 13 green flowers to spread out amongst kusudama balls.

I am so happy with this project, despite the amount of time it will take to make these! However, because the folds are very simple, I can easily enlist Mr. S or some bridesmaids to help get the work done as we get closer to the date.

So...ceremony decorations for less than $20? I think that's a very good thing!

Read more...

Thursday, January 22, 2009

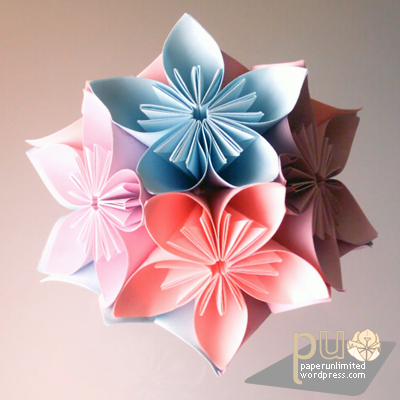
Kusudama: Ceremony Decorations

Source: Paper Unlimited

I've always liked doing origami, ever since I was a small kid. I can't say I'm great, but I can certainly fold a think or two. I'm going to be integrating origami into my escort cards (I'm hoping to finally be able to blog that soon, it's been a bit of an ightmare!), but I think there are a lot of other places I can integrate some of my origami skills.

This kusudama ball I think is absolutely gorgeous. How cute would it be to find a cool patterned origami paper (or even just plain white for simplicity) and make up a bunch of these, secure a ribbon in the center of each ball, and then attach them to the end of the pews for the ceremony? Since I don't have any money in my budget to decorate my church, I think this would be such a fun way to add an interesting element to things.

And, the best thing? It doesn't take much origami knowledge at all to make these flowers, it really only takes time. Which means, I can recruit helpers when the time comes! Check out these easy instructions to make your own. This is totally what I'm going to be doing this weekend as I'm holed up, trying to survive whatever awful weather is thrown at us next!

Read more...

About This Blog

About This Blog

  © Free Blogger Templates Spain by Ourblogtemplates.com 2008

Back to TOP